
Install
Forgelyne runs on Macs with Apple silicon and macOS 13 or later. It is free, and the download is about 19 MB.
Forgelyne is signed for local use, so macOS asks once before opening it:
- 1
Open Forgelyne.dmg and drag Forgelyne to Applications.
- 2
Open Forgelyne. macOS says it can't check the app, because it is signed for local use: click Done.
- 3
Open System Settings › Privacy & Security, scroll to Security and click Open Anyway next to Forgelyne, then confirm. From then on it opens like any other app.
Forgelyne checks for a new version at launch and every 6 hours while it is open, and offers to install it in place. Forgelyne › Check for Updates… checks right away. Your settings, sessions and chats stay where they are.
Getting started
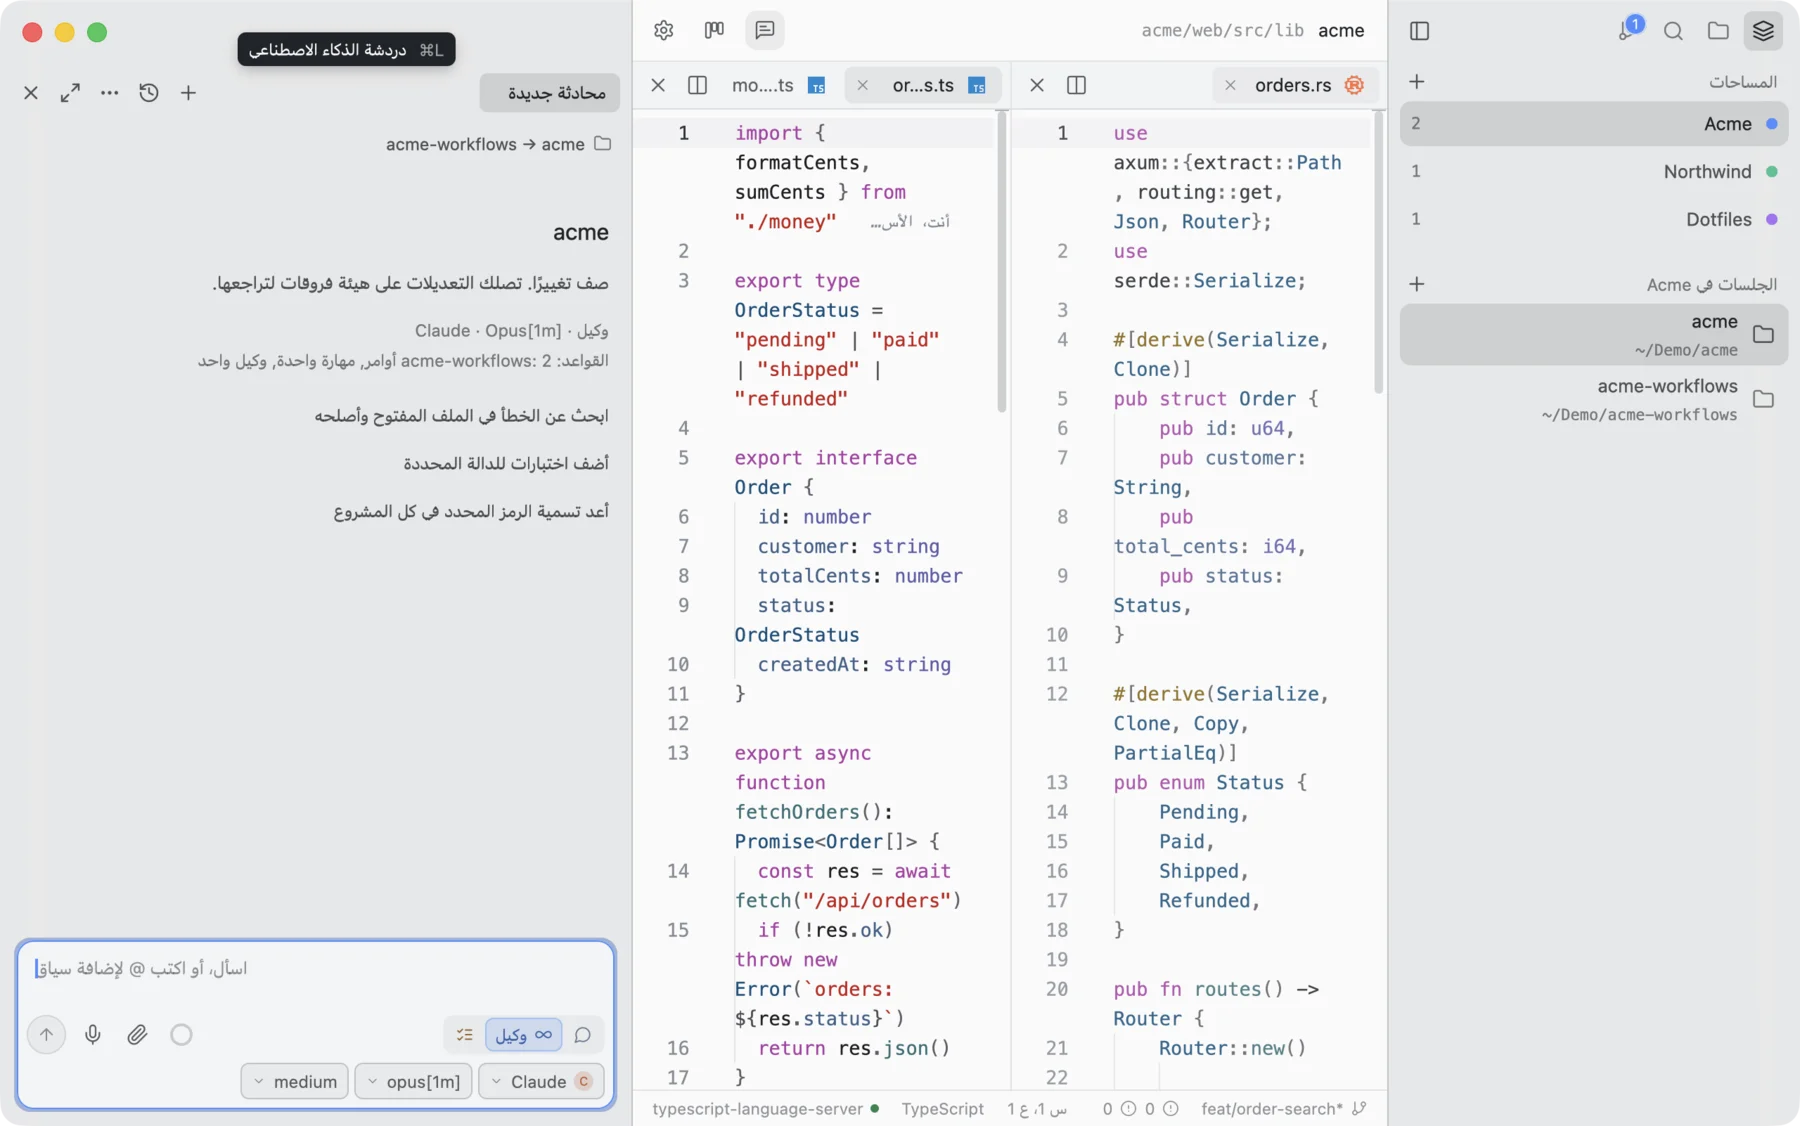
Spaces group your work, like Arc: each lists the projects you opened in it and its loose files, so a client project, a side project and your dotfiles never mix. ⌥⌘S shows them, ⇧⌘N makes a new one, and a two-finger swipe moves between them.
Projects and tabs. Open a folder with ⌘O, and its files open as tabs across the top. ⌘\ splits into groups and ⌃⇥ goes back to the last file. ⌘P finds any file by a few letters of its name. Add :42 to land on line 42.
The side panel holds Spaces, Explorer, Search and Source control, switched by the icons next to the window buttons. ⌘B shows or hides it. Right-click a file in the explorer to add it to the AI chat, find references, see its changes and history, copy its path or rename it.
The editor
Multiple cursors with ⌥-click, ⌘D for the next match and ⇧⌘L for every match. Column selection with ⌥-drag, find and replace with regular expressions (⌘F, ⌥⌘F), go to line (⌃G), comment (⌘/), move lines (⌥↑⌥↓), folding, word wrap (⌥Z) and an optional Vim mode. Large files open at once.
Suggestions appear in grey as you type: ⇥ accepts, ⌥→ takes one word, esc dismisses. Settings › AI › Autocomplete picks the model and the files never sent. Markdown files switch to a rendered preview with ⇧⌘V.
⇧⌘F searches every file of the project, respecting .gitignore, and replaces in all of them.
Languages
Syntax colors, folding and an outline (⇧⌘O) for TypeScript, JavaScript, Rust, Python, Go, Swift, Ruby, PHP, HTML, CSS, JSON, YAML, TOML, Markdown, SQL, Dockerfile and Bash.
With a language server installed you also get errors and warnings as you type, hover, go to definition (F12), references (⇧F12), rename across files (F2), quick fixes (⌘.), completions and format on save. Biome lints and formats JavaScript, TypeScript, JSON and CSS.
The AI agent
⌘L opens the AI panel beside your code. Ask answers questions about the project, Plan writes a plan without touching anything, and Agent makes the change. A plan opens as a document with its checklist. Build runs it and ticks each step, with the agents at work shown above.
The timeline. What the agent does builds up as it works: how long it took, each thought and step, the files, folders and pages it read as chips (with “+3 more”), a red step when something failed, and a check when it is done. Paths open in the editor at their line, links in the browser.
Agent mode. The expand button in the panel’s header moves the conversation into a tab of the editor area, live, even while the agent works. The collapse button brings it back to the side.
Your changes, your call. The agent never writes straight to disk: its edits show as differences in the editor, and you keep or drop each one. Every turn keeps a checkpoint, so Restore puts the files back. Commands wait for your OK unless they are on your allowlist, and the agent asks before reading or editing outside its folders.
Context. Type @ to add files, folders, the selection, the git diff, terminal output or the current problems; paste a screenshot with ⌘V. Type / for a prompt from your library or a command, skill or agent from .claude/. ⌘K in the editor rewrites the selection from a short instruction.
AI folders. Right-click a project in Spaces › AI settings to run the AI from another folder, for example a shared workflow folder with its CLAUDE.md, commands and skills, while it changes this project. @ then finds that folder’s files too. Project rules come from .cursor/rules, AGENTS.md and CLAUDE.md.
The … menu starts a new conversation, renames, duplicates, exports as Markdown or deletes the current one; Delete asks first.
Connecting a model
Forgelyne finds what is on your Mac, and Settings › AI shows each provider with its models. Pick one per chat.
- Claude plan: install Claude Code, run
claudeonce and log in. - ChatGPT plan: install Codex, run
codexonce and log in. - API keys: Anthropic, OpenAI or any OpenAI-compatible server, kept in the macOS Keychain.
- Local models: Ollama and LM Studio are found when they run.
- Amazon Bedrock: your AWS profiles and regions, or a Bedrock API key.
The browser
⌘⇧B opens the Browser tab. It shows your web app in a headless Chrome, so the page looks the way Chrome draws it. Running dev servers are offered as links.
⌘⇧C picks an element. You see its selector, size and styles, and you can change a style or its text live in the page. Or add the element to the chat with a cropped image, so the agent edits the source.
Commit trail and source control
Added, changed and deleted lines are marked beside the line numbers, and the line you are on shows who changed it last. Source control (⌃⇧G) lists changes as a list or a tree, stages, stashes or discards whole folders, writes the commit message for you, commits, amends and pushes.
⇧⌘H opens the commit trail: every branch, remote branch and tag on a lane graph, each branch in its own color, forks and merges as curves, and a ring on the commit you have checked out. Older commits load as you scroll. Open a commit for its author, files and message, or expand the trail into a tab with the diff beside it. The header can fold each merge’s branch into one row.
The branch picker in the status bar lists branches and tags with their last commit, creates branches, checks out detached, fetches and pulls.
Review center
The review button in Source control opens your branch as a pull request against the base you pick. Go through each change with A approve, E edit, R reject and S skip, add notes, then stage what you approved, commit, commit to a new branch or revert what you rejected. Copy a pull request description when you are done.
Cyclevane issues
Settings › Cyclevane › Connect signs you in with the browser. Pick the Cyclevane project of a session in its AI settings, then the issues icon at the top right (⌥⌘I) shows its issues as a board or a list, live. Drag a card to change its status, and filter by status, assignee, label and priority.
New issue in the header, ⌘N in the board, or + on a column to start it in that status: give it a title, a description, a priority, an assignee and labels. It appears on the board at once.
Tracklyne errors
Connect a Tracklyne key in Settings › Tracklyne and link the project. The Errors tab then lists the project’s error issues by status.
Open an error for its stack trace. Frames in your project open at their line. Add to chat hands the error to the agent.
Harness
Project settings › Harness lists what each project uses: MCP servers, skills, commands, agents, rules files and hooks. Turn any of them off, or add your own, for that project only.
Hooks can check or block a tool call before it runs.
Terminals
⌃` shows the project’s terminals at the bottom, ⇧⌃` adds one. Each command keeps its output as a block, ⌃R searches the history, and full-screen programs run as they should.
Command line
Forgelyne › Install the forgelyne and fl commands adds two names for the same command:
fl                     # open or bring Forgelyne forward
fl ~/projects/shop     # open a folder
fl src/app.ts:12:4     # open a file at line 12, column 4
fl -s Clients ~/acme   # open in the space named Clients
git config --global core.editor "fl -w"   # wait until the tab is closed
Themes and languages
Light and dark follow macOS. Import a VS Code or Zed theme file in Settings › Appearance. The interface is in English, French and Arabic, following macOS or your choice in Settings › General; in Arabic the layout mirrors and code stays left to right. Every shortcut can be changed in Settings › Keyboard.
Your data and usage data
Your work stays on your Mac, in ~/Library/Application Support/Forgelyne: settings, keybindings, sessions, chats and imported themes. If something goes wrong, ~/Library/Logs/Forgelyne/forgelyne.log says what happened.
Forgelyne reports installs, errors and usage to Tracklyne, so problems get fixed sooner. Settings › General › Usage data has one switch for all of it and one for each part. File contents, prompts, paths, keys and your IP address are never sent.
Keyboard
- Go to file / command palette
- ⌘P/⇧⌘P
- Open folder / side panel
- ⌘O/⌘B
- Explorer / source control
- ⇧⌘E/⌃⇧G
- Spaces
- ⌥⌘S
- Find in project / go to symbol
- ⇧⌘F/⇧⌘O
- AI panel / inline edit
- ⌘L/⌘K
- Commit trail
- ⇧⌘H
- Cyclevane issues
- ⌥⌘I
- Browser / pick an element
- ⌘⇧B/⌘⇧C
- Split right / down
- ⌘\/⇧⌘\
- Close tab / reopen closed tab
- ⌘W/⇧⌘T